Cloudfront Proxy Integration
Prerequisites
- An AWS account.
- An existing CloudFront distribution that serves the web app's content OR a new CloudFront distribution that is configured to serve content on the same eTLD + 1 or on any of its subdomains.
Integration setup overview
The integration setup consists of several manual and automatic steps. Each of the following steps is discussed in detail in a separate section below.
- Contact our support to obtain environment variables and client-side JavaScript configuration.
- Issue a Proxy Pre-Shared Secret in the Fingerprint Pro dashboard.
- Create a new secret in the AWS Secrets Manager.
- Create a new CloudFront distribution (Optional).
- Install the CloudFormation application.
- Configure the CloudFront distribution.
- Configure the Fingerprint Pro JavaScript agent on your client.
Step 1 - Contact support
Contact our support at support@fingerprint.com and provide us with your application name and account email. These pieces of information can be found in your dashboard.
Our support team will provide you with instructions on configuring your Fingerprint Pro Javascript Agent, as well as the required environment variables: FPJS_BEHAVIOR_PATH, FPJS_AGENT_DOWNLOAD_PATH, and FPJS_GET_RESULT_PATH.
Step 2 - Issue a Proxy Pre-Shared Secret
You need to issue a Proxy Pre-Shared Secret to authenticate requests from your Lambda@Edge function.
- Go to the Fingerprint Pro dashboard and select your application.
- In the left menu, click App settings and switch to the API keys tab.
- Click Create key and select Proxy Pre-Shared Secret.
- Click Create.
This Proxy Pre-Shared Secret value will be used later in the FPJS_PRE_SHARED_SECRET variable.
Step 3 - Create a new secret in the AWS Secrets Manager
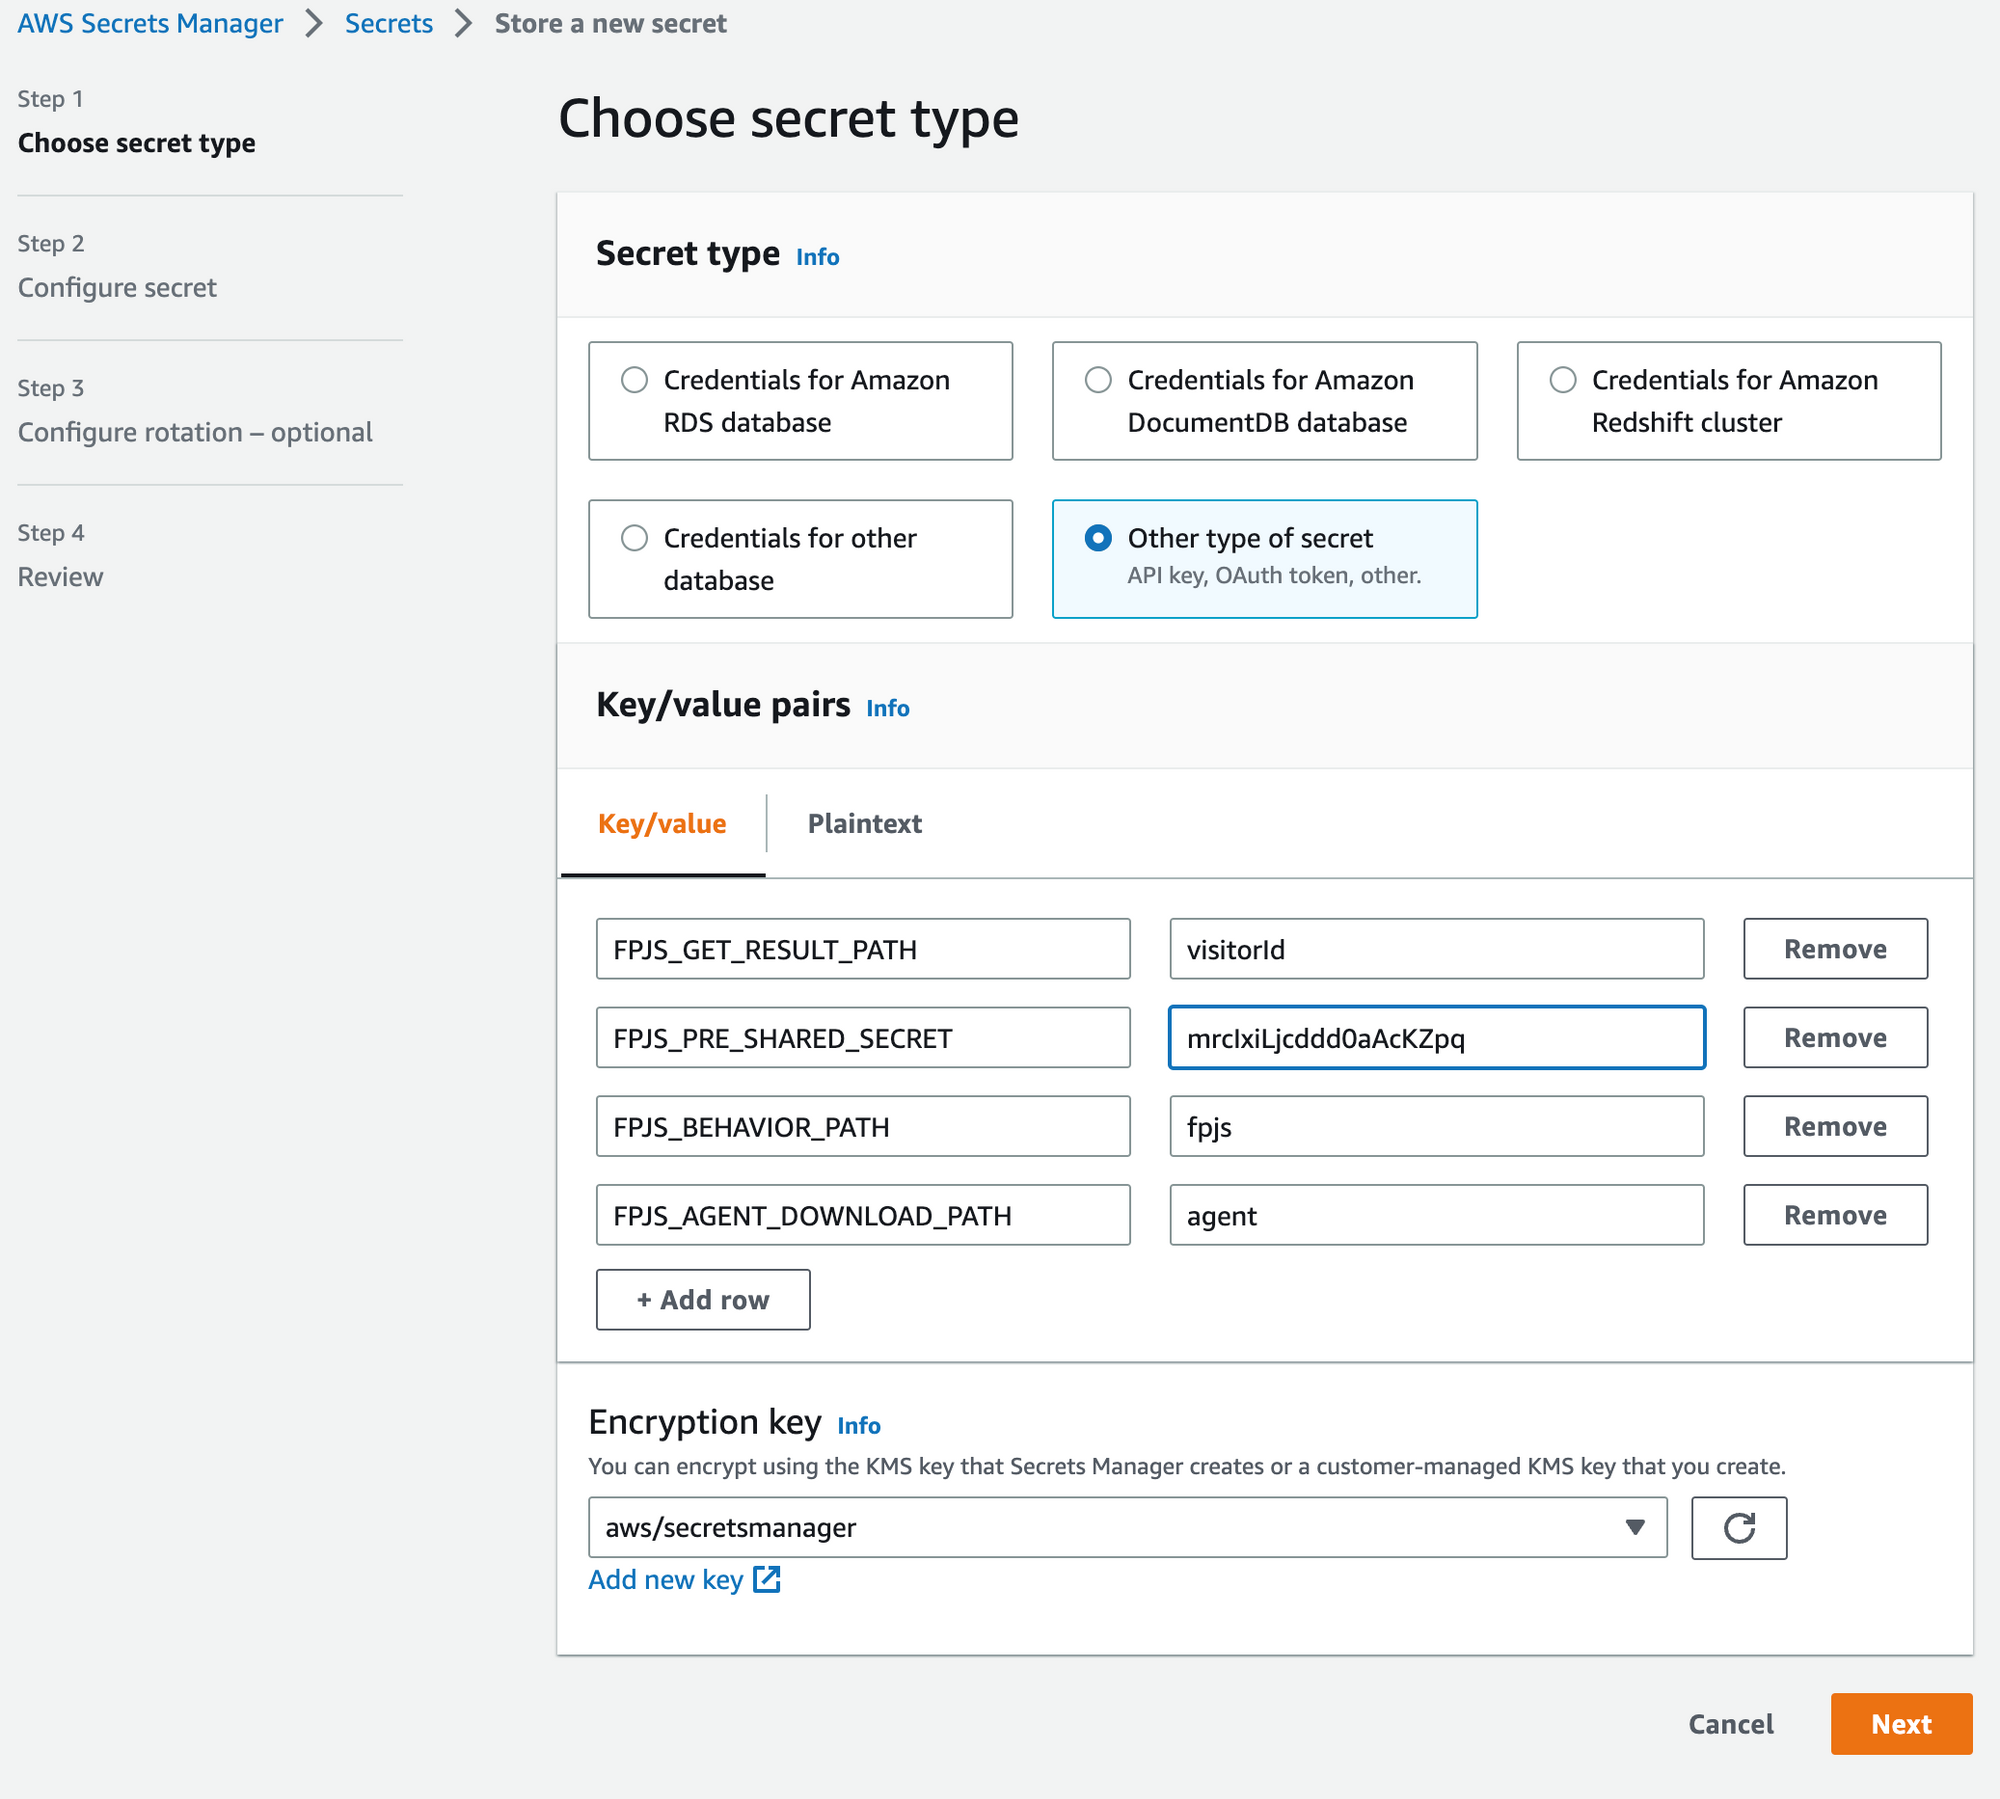
- Go to AWS Secrets Manager and click Store a new secret.
- Choose Other type of secret as the secret type.
- Add the 4 required values in the Key/value pairs section:
- The key
FPJS_PRE_SHARED_SECRETwith the value of the Proxy Pre-Shared Secret which was issued in Step 2. - The keys and values for
FPJS_BEHAVIOR_PATH,FPJS_AGENT_DOWNLOAD_PATH, andFPJS_GET_RESULT_PATHwhich you obtained from our support team in Step 1.
- Click Next.
- Specify the secret name — it will be used further in the configuration. Click Next.
- Leave Automatic rotation disabled and click Next.
- Click Store.
Your secret is created. Remember the Secret name and which Region it was created in (see the upper-right corner of the screen).
Step 4 - Create a new CloudFront distribution (OPTIONAL)
If your website is already running on CloudFront, you can use your existing CloudFront distribution. Skip the following step and move on to Step 5.
If your website is not running on CloudFront, you can create a new CloudFront distribution for the proxy and set up a subdomain on your website that points to it, for example: metrics.yourwebsite.com
- Go to your AWS Console and open CloudFront.
- Click Create distribution.
- Set up the distribution's Origin according to Step 6.1 of this guide (you can then skip this step).
- Leave default settings for Cache behavior, select CachingOptimized for cache policy (you will replace this in Step 6.2 of this guide).
- Click Create distribution.
- In your newly created distribution, inside General → Settings, click Edit.
- Under Alternate domain name (CNAME) - optional click Add item.
- Enter a unique subdomain, for example
metrics.yourwebsite.com. Make sure it is one not used by any other services. - You will now need to add an SSL certificate for your alternate domain.
- To create the SSL certificate, click Request certificate. AWS Certificate Manager will open in a new tab.
- Set the domain name to the alternate domain used in the previous step.
- Keep DNS validation as a way to prove ownership of the domain.
- Click Request and then View certificate.
- Use the CNAME name and CNAME value to add a subdomain CNAME record to your DNS provider.
- It can take a while for AWS to verify the ownership of the domain and issue the certificate. Feel free to continue with the rest of the setup and come back here later.
- Once the certificate is issued, return to the previous tab displaying your distribution’s Edit settings page and select the certificate under the Custom SSL certificate setting, then click Save changes.
- You will also need to add a CNAME record to your DNS provider pointing from your alternate domain to the domain of your Cloudfront distribution, which can be found under the General tab of your distribution. For example:
- CNAME name:
metrics.yourwebsite.com - CNAME value:
<randomstring>.cloudfront.net
- CNAME name:
Your CloudFront distribution should now be accessible from your website's subdomain, for example, metrics.yourwebsite.com. You will use it in Step 7 to configure the Fingerprint Pro JS Agent.
Step 5 - Install the CloudFormation application
Lambda@Edge function and corresponding settings (AWS Lambda execution role and cache policy for CDN) are provided as a CloudFormation application. Go to the Fingerprint Pro Cloudfront Integration application page to open the deployment dialog.
Lambda@Edge functions that are used to handle requests to CloudFront and responses from CloudFront must be deployed to the us-east-1 region. Make sure that you’ve selected this region before deploying the application.
Fill in the required values to the application settings and deploy the application to your AWS account.
- DistributionId is the identifier of your CloudFront distribution.
- SecretName is the name of the secret you created in the previous step.
- SecretRegion is the region where the secret is stored, e.g. us-east-1.
This application creates the custom IAM roles that allow us to modify CloudFront distribution to keep the Lambda@Edge function up to date. You can review these policies in the SAM template.
After deployment, you will be redirected to the application page where you can see a list of resources created by the application.
Open the Deployments tab (see the screenshot below) and wait for the CREATE_COMPLETE status message.
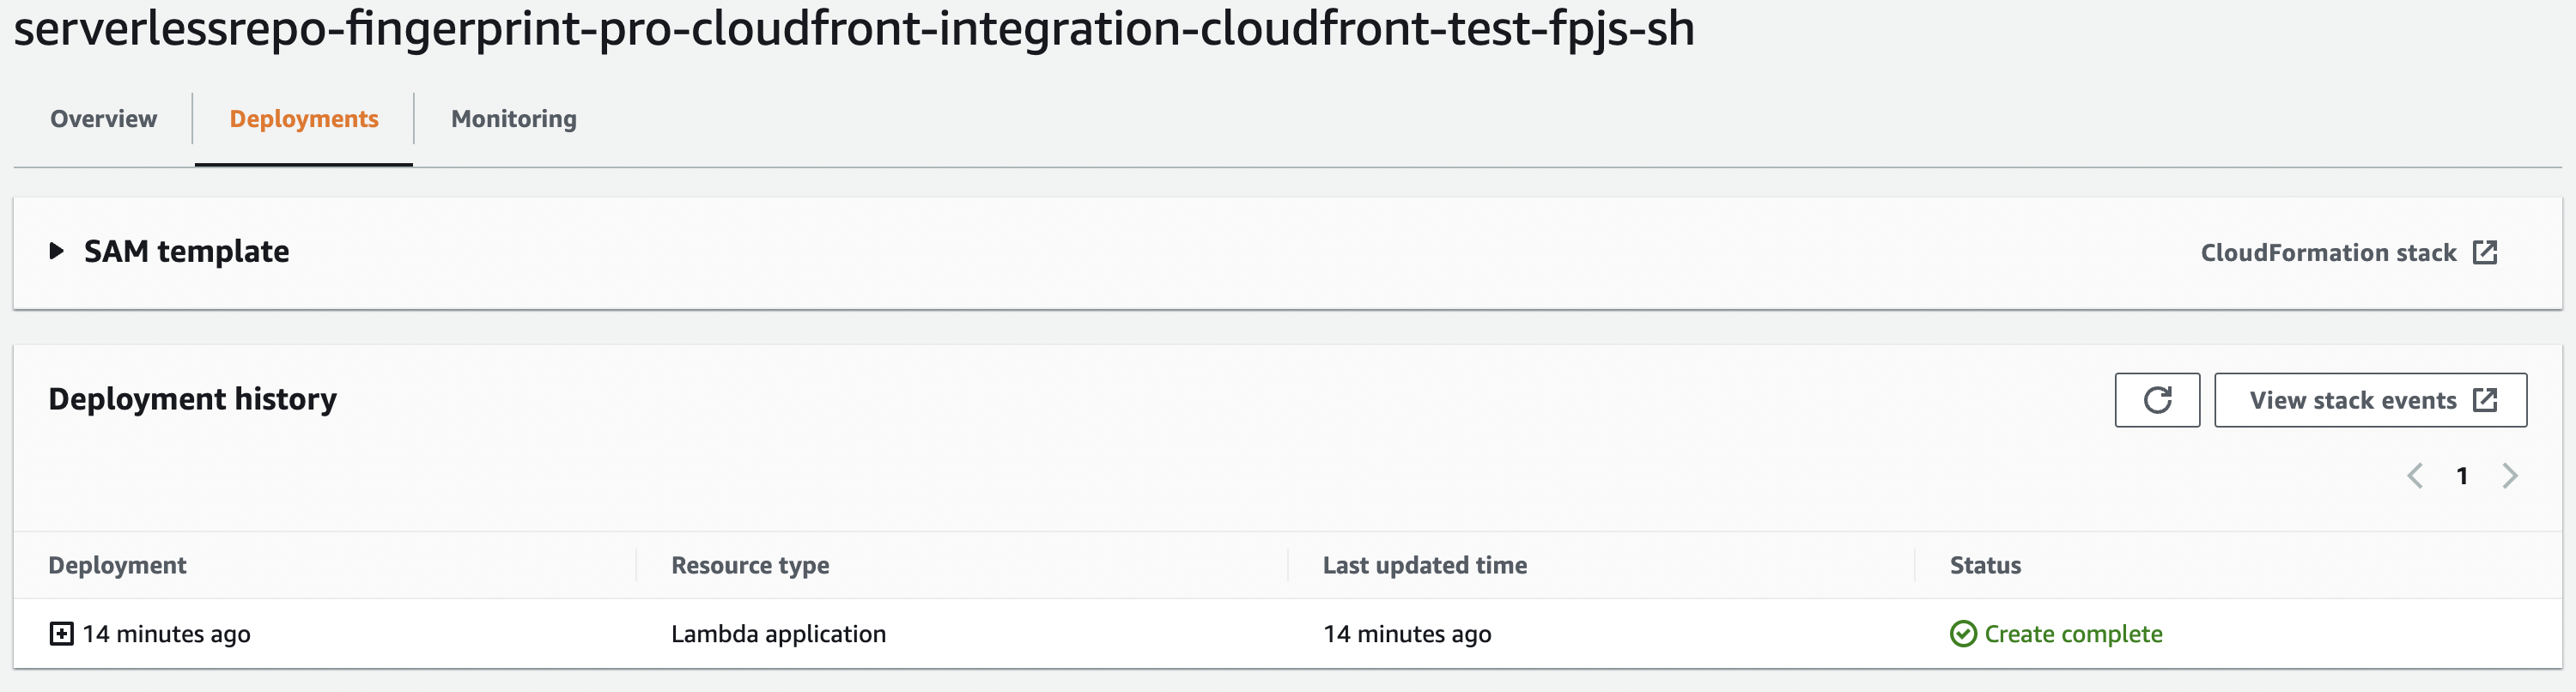
Deployment status
The Status indicates the current state of deployment. It starts from REVIEW_IN_PROGRESS to CREATE_IN_PROGRESS, and finally CREATE_COMPLETE. If you see a different status (CREATE_FAILED, ROLLBACK_IN_PROGRESS, ROLLBACK_COMPLETE, etc), please contact our support.
Once the application is fully deployed (AWS Stack has status CREATE_COMPLETE), you can click CloudFormation stack, switch to the Outputs tab, and find the names of created entities.
- The export name of the LambdaFunctionName is a unique name of the created Lambda@Edge function.
- The export name of the CachePolicyName is a unique name of the CloudFront cache policy, which will be applied in a cache behavior for Fingerprint Pro requests.
Step 6 - Configure the CloudFront distribution
Step 6.1 - Create a new origin (Skip if origin set in Step 5)
- Go to your CloudFront distribution, switch to the Origins tab, and click Create origin.
- Fill required fields in the wizard:
- Set the origin domain to fpcdn.io.
- Set the protocol to HTTPS only.
- Set minimum origin SSL protocol to TLSv1.2.
- Set name to fpcdn.io.
- Add the following custom headers:
FPJS_SECRET_NAMEis the name of the secret created in step 3.FPJS_SECRET_REGIONis the region where the secret is stored, for example, us-east-1.
- Finally, click Create origin.
Step 6.2 - Create a cache behavior
In this step, you will create a cache behavior to proxy requests to Fingerprint Pro API.
- Go to your CloudFront distribution.
- Switch to the Behaviors tab and click Create behavior.
- Fill in the required fields in the wizard:
- Set Path pattern to a value that matches all routes under
FPJS_BEHAVIOR_PATH. For example, forFPJS_BEHAVIOR_PATH=random-pathyou need to userandom-path/*. - Set Origin and Origin groups to fpcdn.io.
- Set the Viewer protocol policy to Redirect HTTP to HTTPS.
- Set the Allowed HTTP methods to GET, HEAD, OPTIONS, PUT, POST, PATCH, DELETE.
- Set Cache key and origin requests to Cache policy and origin request policy (recommended).
- Under the Cache policy dropdown, select the Custom policy named FingerprintProCDNCachePolicy-{id} (you can find the name of your cache policy on the AWS Stack’s output of the application).
- Set Origin request policy to AllViewer.
- Click Create behavior.
- Set Path pattern to a value that matches all routes under
Step 6.3 - Attach the Lambda function to the cache behavior
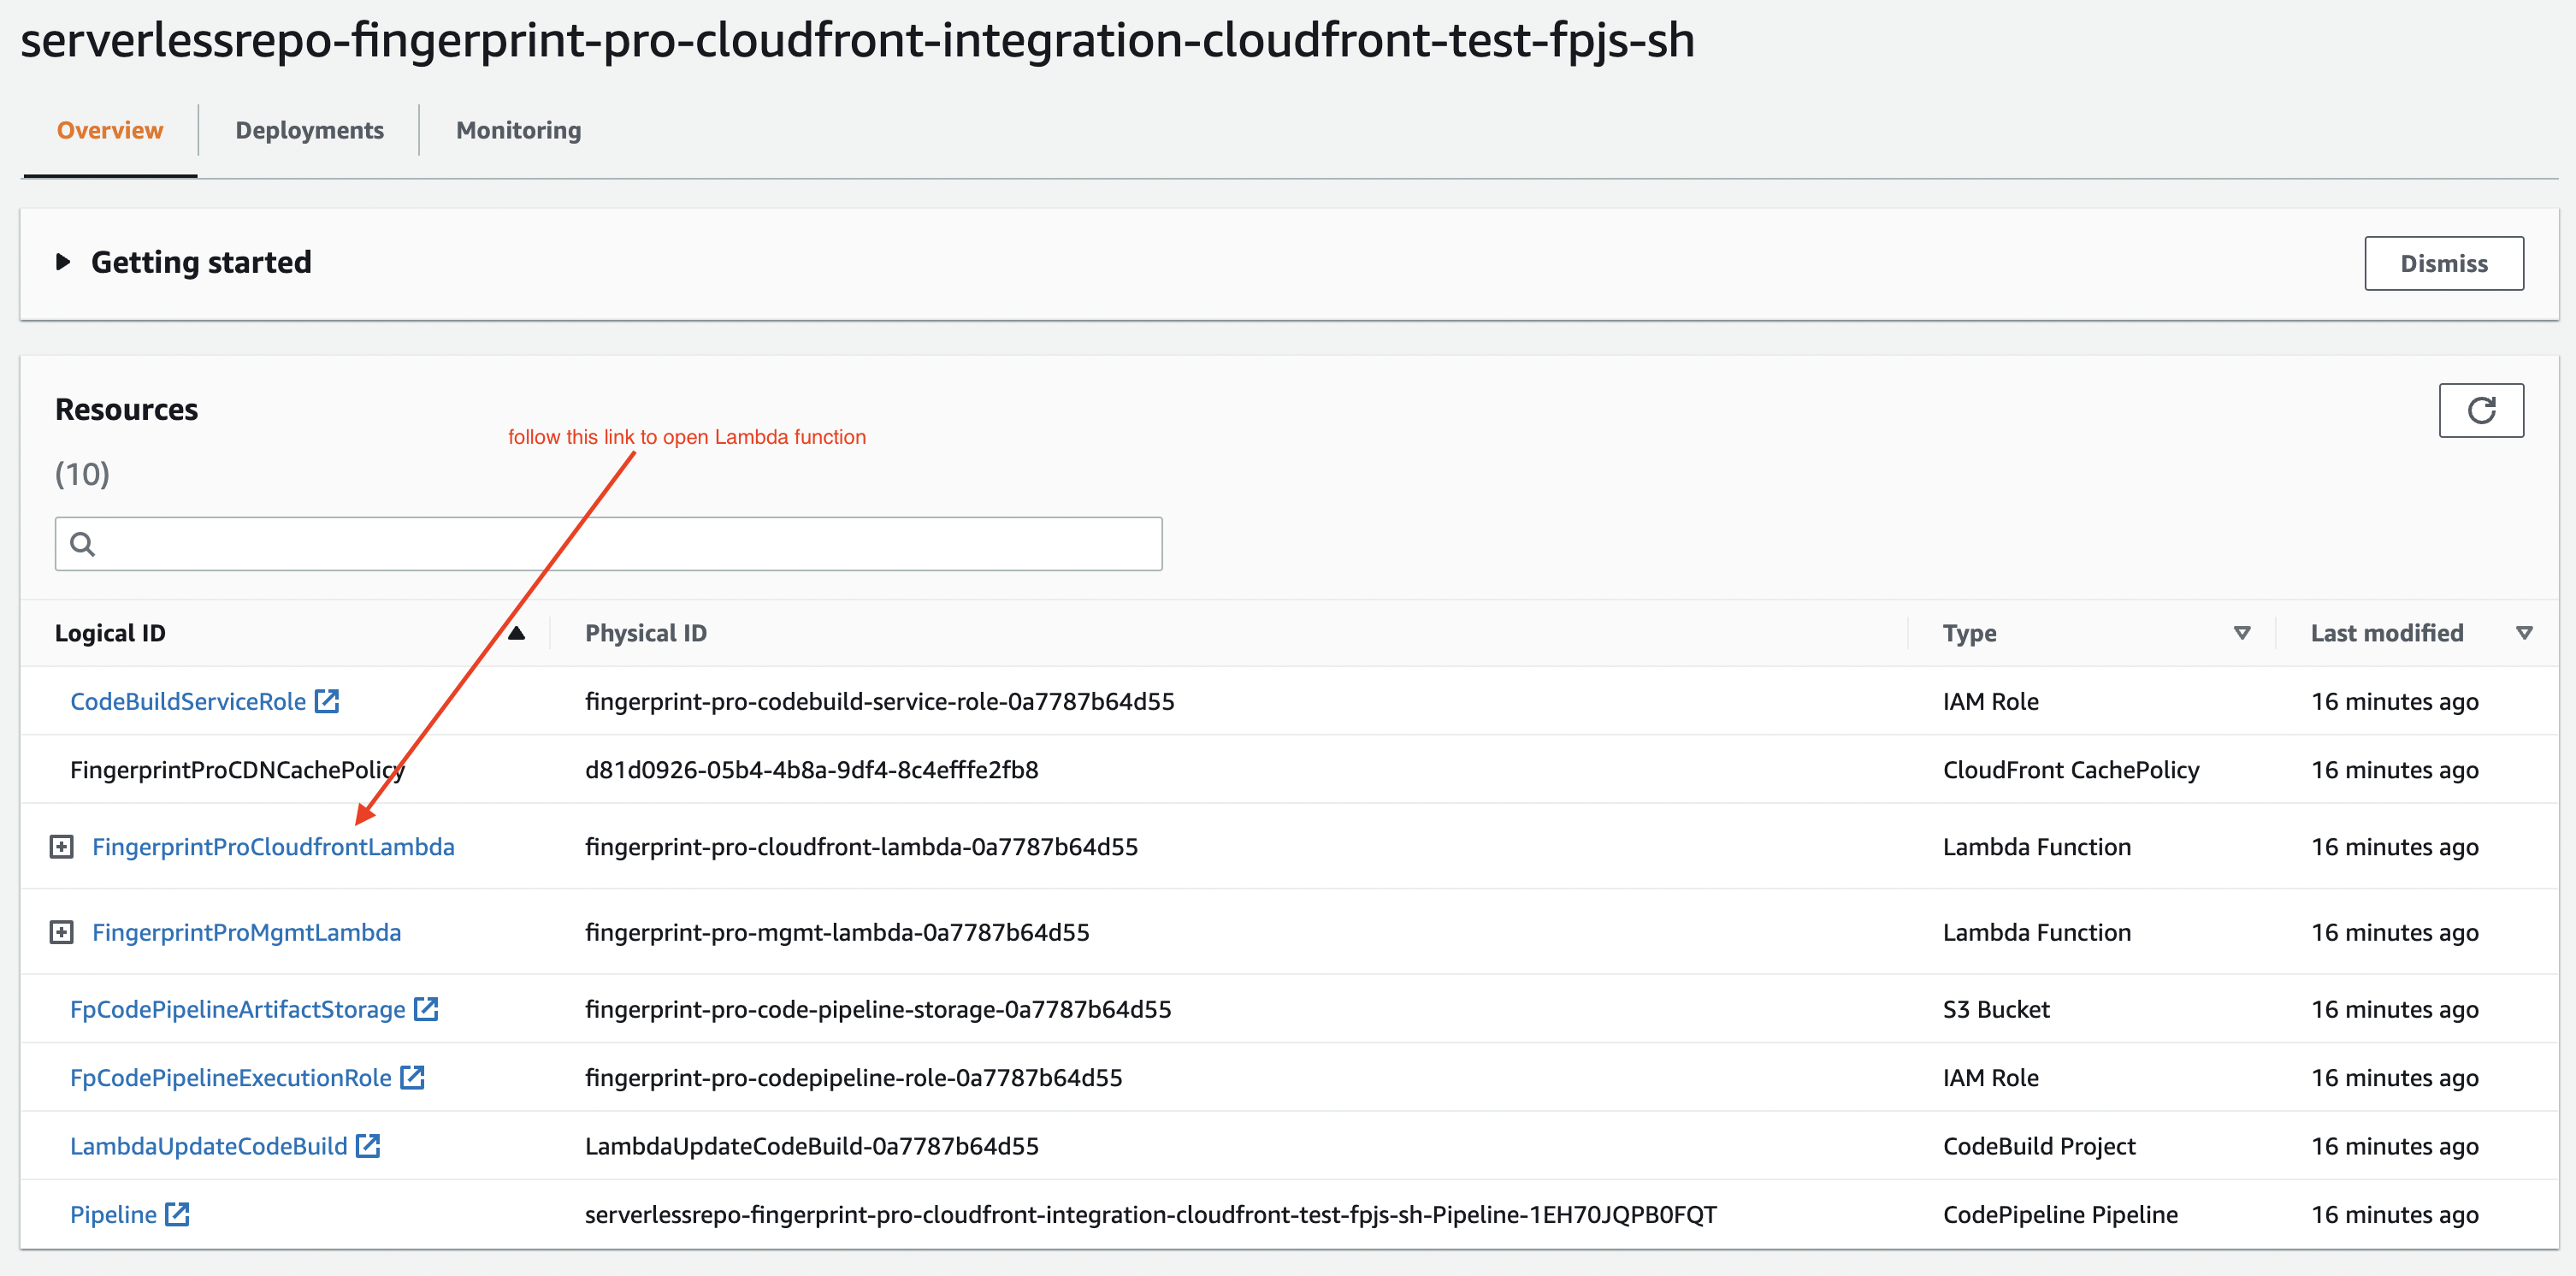
- Go to your AWS Lambda Applications and open the newly created application.
- On the Overview tab, scroll down to Resources and click FingerprintProCloudfrontLambda
- Scroll down and switch to the Configuration tab.
- On the left, click Triggers, then click Add trigger.
- Select CloudFront as the source and click Deploy to Lambda@Edge.
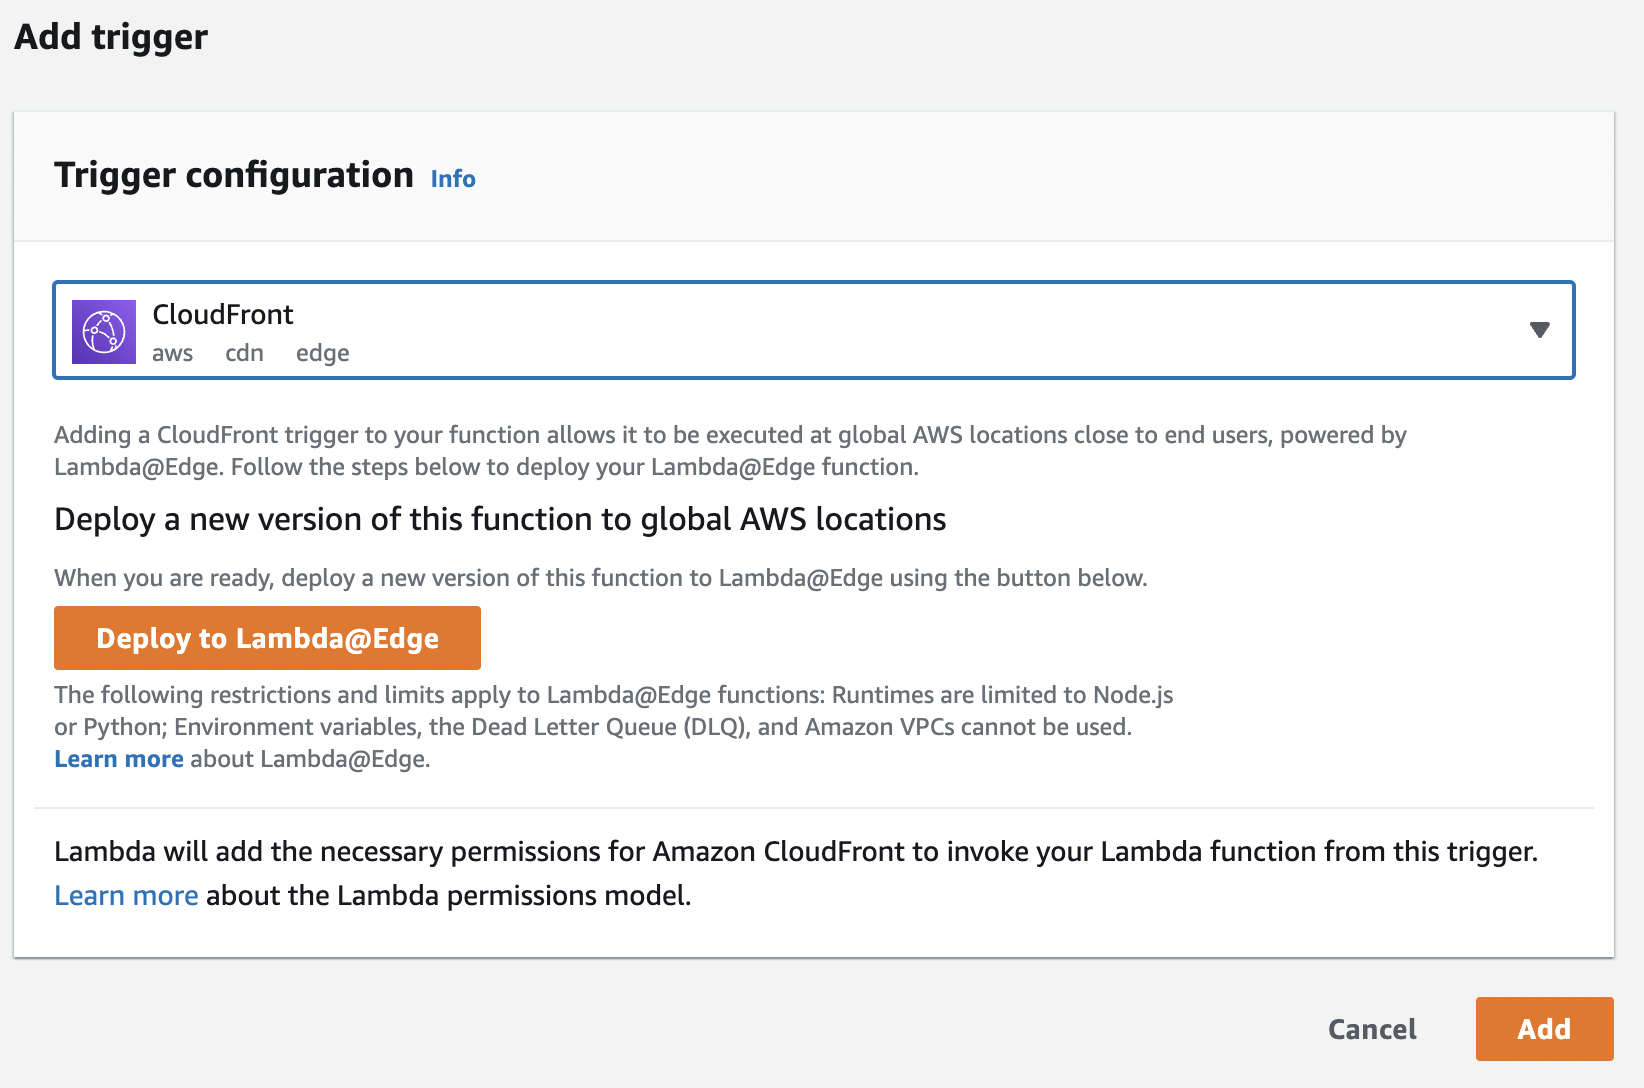
- Select an option to Configure new CloudFront trigger.
- Select your distribution.
- Select the cache behavior you created in the previous step.
- Set CloudFront event to Origin Request.
- Check Include body.
- Check Confirm deploy to Lambda@Edge.
- Click Deploy.
It may take up to several minutes to add a trigger to the CloudFront distribution. Go to the General tab of your CloudFront distribution and check the Last modified time.
Step 7 - Configure the Fingerprint Pro JavaScript agent on your client
Configure your frontend application according to the instructions provided by the Fingerprint Pro support team.
If your website and the proxy are behind the same CloudFront distribution, the JS Agent configuration will use randomized URLs inside your domain, for example:
JavaScript
const url = 'https://yourwebsite.com/mJObz0vS2qXt0DZG/XqWY5V2XDOMDquDC?apiKey=<PUBLIC_API_KEY>';

const fpPromise = import(url)

.then(FingerprintJS => FingerprintJS.load({

endpoint: 'https://yourwebsite.com/mJObz0vS2qXt0DZG/5CYL1Y0irO5Rg6Ct?region=us'

}));
If your website is not behind CloudFront and you have set up CloudFront distribution on your subdomain according to Step 4, the JS Agent configuration will use that subdomain to interact with Fingerprint Pro, for example:
JavaScript
const url = 'https://metrics.yourwebsite.com/mJObz0vS2qXt0DZG/XqWY5V2XDOMDquDC?apiKey=<PUBLIC_API_KEY>';

const fpPromise = import(url)

.then(FingerprintJS => FingerprintJS.load({

endpoint: 'https://metrics.yourwebsite.com/mJObz0vS2qXt0DZG/5CYL1Y0irO5Rg6Ct?region=us'

}));
If everything is configured correctly, you should now successfully receive data through your CloudFront distribution.